


Editor’s Note: This blog was originally published in 2022 and has been fully updated to ensure accuracy and comprehensiveness. All sections have been expanded and refreshed to reflect the latest best practices and market insights for MSPs and VARs.
Wi-Fi signal strength is the measurement of power from the perspective of your Wi-Fi enabled device (phone, tablet, laptop etc.) indicated in graphic bars or notated numerically in RSSI (Received Signal Strength Indicator) level.
This is NOT the actual signal that your access point is transmitting.
A common reason why you may be experiencing connectivity issues is due to poor Wi-Fi signal strength.
For MSPs and VARs, Wi-Fi isn’t just about coverage, it’s about delivering reliable connectivity as part of a broader recurring revenue model. Poor signal strength doesn’t just create support tickets, it creates churn risk.
Customers expect modern, high-performance networks, and your ability to design and deliver those experiences directly impacts your margins and client retention.
That’s why understanding Wi-Fi signal strength and design principles matters for your sales and fulfillment teams. More importantly, why you need to package Wi-Fi into standardized, subscription-based offers like Network as a Service that can scale.
What is a Wi-Fi signal?
Wi-Fi signals are a type of electromagnetic (EM) wavelength, transmitted as radio waves. These are the invisible carriers that move your customers’ data between devices and access points.
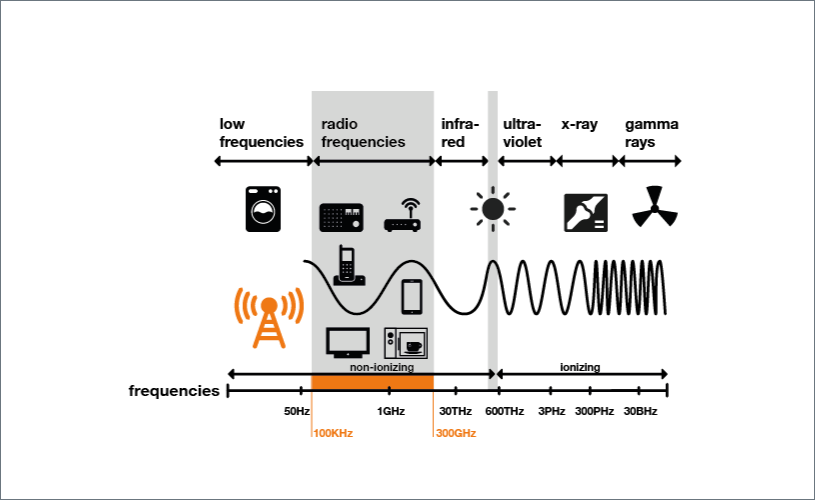
Image source: Radio Waves Orange
However, radio waves are not directional so their movements are more like ripples in a pond and less like the laser beams in a Star Wars movie.
From a sales perspective, it’s less about teaching your customer the physics of RF and more about translating performance into business outcomes, better coverage, fewer tickets, and predictable user experiences.

How do Wi-Fi signals work?
Your Wi-Fi uses these radio waves to deliver data (in the industry, we know them as packets) from one device to another. To transmit a signal, your access point uses either the 2.4 or the 5 GHz band. And within these bands are smaller bands called Wi-Fi channels.
To help your visualize—imagine that the different bands are like highways and the channels are different lanes within that highway.
Here's a visualization of a 5Ghz band "highway":
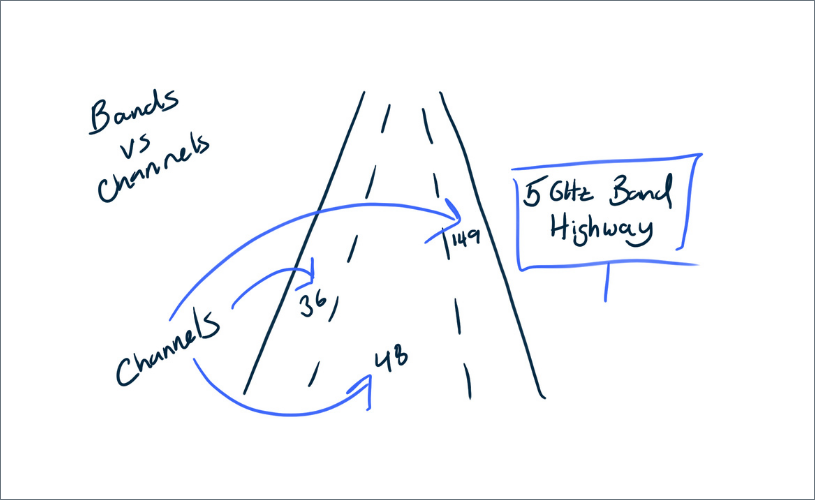
The data or packets that we transmit travel in different lanes along these highways to their destinations, and yes, it can get pretty congested, but that's a different topic.
How do we measure Wi-Fi signal strength?
There are three main ways Wi-Fi signal strength is measured:
-
mW (milliwatts) – most accurate, rarely used in the field.
-
dBm (decibel-milliwatts) – standard measurement used by engineers, typically between -30 and -90 dBm.
-
RSSI (Received Signal Strength Indicator) – vendor-specific, often shown as bars on a device.
First—the most accurate measurement of Wi-Fi signal strength is measured in mW (milliwatts).
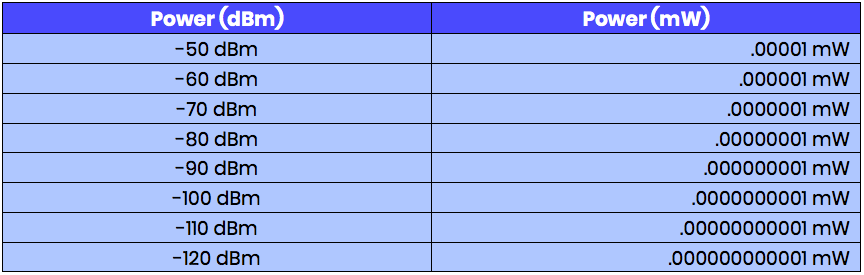
However, there ends up being a bunch of decimal places because Wi-Fi has low transmit power, so we more commonly measure in the decibels with relation to milliwatts known as dBm (decibel-milliwatts).
Since Wi-Fi signal strength is less than zero dBm, it's measured in the negatives.
There's also a ten-fold change in mW as it relates to decibels. Here's a chart of the logarithm:
For the most part, dBm is the way that most network engineers measure signal strength. However, many manufacturers use an additional measurement tool called RSSI (Received Signal Strength Indicator) to measure signal strength.
RSSI is typically notated on the Wi-Fi devices in graphical terms (indicator bars) or numerically, as shown below.

But RSSI is only a relative index because each manufacturer uses an arbitrary set of units. This unit of measurement is different all the time because it's being pulled from the client's device.
For example, the Atheros Wi-Fi chipset measures RSSI based on values 0 (no signal) to 60 (max. signal). While other chipsets might use different values, such as 0-100 or even 0-255.
As if trying to understand the physics of Wi-Fi wasn't confusing enough, the units of measurement are just as complicated.
So here's a quick and easy breakdown of how to measure signal strength:
- mW - Milliwatts (1 mW = 0 dBm)
- Most accurate but hardest to measure; used by scientists and engineers
- dBm - Decibels in relation to milliwatts (usually -30 to -90)
- Mid-accuracy; mid-comprehensible; most common; used by engineers
- RSSI - Received Signal Strength Indicator (usually 0-60 or 0-255)
- The least accurate; most arbitrary; easiest to read; used by vendors
Note: Many client devices translate RSSI in dBm, as we will see in the How to check the strength of your Wi-Fi signal section.
For MSPs and VARs, the key takeaway is this: standardize your measurement tools. Your customers may run speed tests, but you need structured methods—heatmaps, signal assessments, and integrated monitoring platforms—to design and deliver consistently.

What's a good Wi-Fi signal strength?
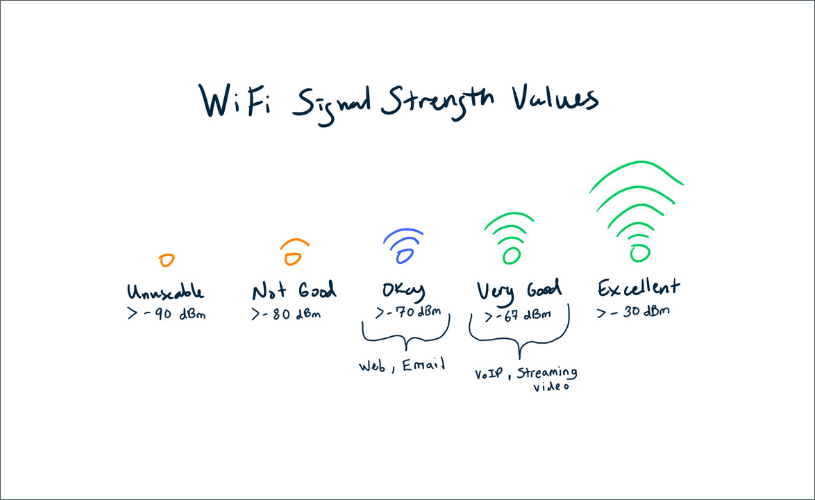
The ideal Wi-Fi signal strength is between -55 dBm and -70 dBm, depending on how close or far away from the access point you happen to be.
- -30 dBm = Excellent - Max achievable signal strength. Your device is most likely only a few feet from the AP to achieve this signal. Neither typical nor desirable in the real world.
- -67 dBm = Very Good - Minimum signal strength for most business applications
- -70 dBm = Okay - Minimum signal strength required for a decent packet delivery.
- -80 dBm = Not Good - Minimum signal strength for basic connectivity. Packet delivery may be unreliable.
- -90 dBm = Unusable - Approaching or drowning in the background transmissions (or noise floor) and causing serious interference with the signal. Any functionality is highly unlikely.
For MSPs and VARs, these aren’t just numbers, they become design standards that should be tied to your SLAs. When Wi-Fi is delivered as a subscription, you need baseline performance thresholds that align sales promises, and solutions or service delivery teams.
How can you check the strength of your Wi-Fi signal?
We are going to show you how to check your Wi-Fi signal strength using some of the most common devices found in businesses—laptops and smartphones. In addition, we will discuss how to use heat mapping software and how to get a performance assessment if you'd rather offload the troubleshooting to us.
- On a Mac computer
- On your PC computer
- On an iPhone
- On your Android device
- With heat mapping software
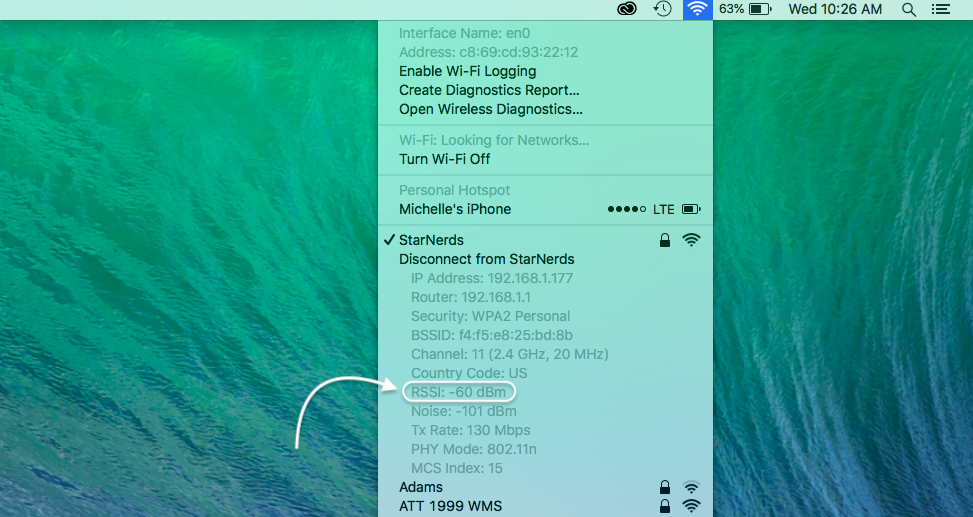
1. On a Mac
Checking your Wi-Fi signal is the easiest if you're running Mac OS.
- Hit the Alt-Option key when clicking the Wi-Fi icon in the top right corner.
- You'll see RSSI and your signal strength in dBm underneath your Wi-Fi network, as shown below.
2. On your PC
If your client device is running Windows on a PC, you can check a general Wi-Fi signal strength through checking the number of bars on your Wi-Fi icon at the bottom right-hand corner.
However, this isn't an accurate way to measure the true strength of your Wi-Fi, so we recommend downloading an app, such as Fing or Wi-Fi Analyzer, if you are using a PC.
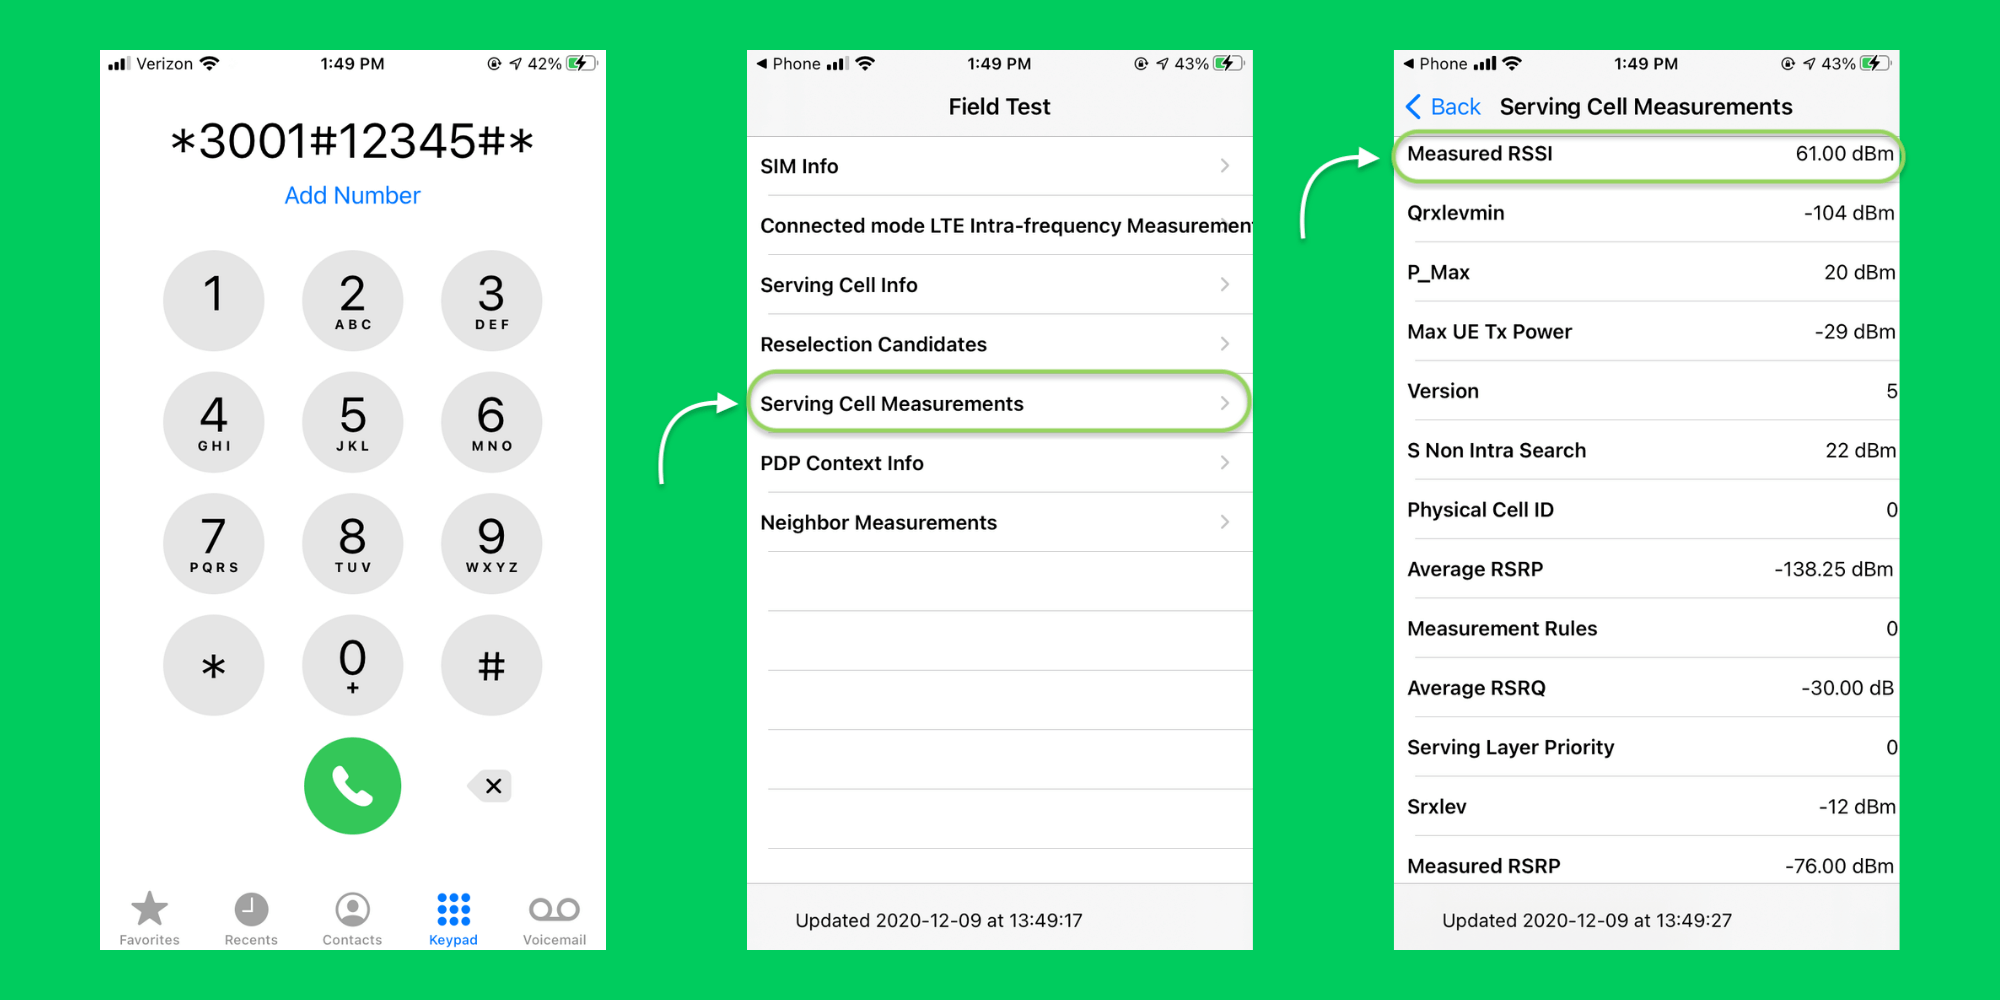
3. On an iPhone
If you're using an iPhone, Apple has a way to view signal strength that will make you feel like a secret agent.
- Open your Phone app and dial: *3001#12345#*.
- Then press call, but instead on a dialing screen, you will see the hidden Field Test menu.
- Next, select Serving Cell Measurements
- You will then see your measured RSSI at the top of the screen!
4. On an Android device
On an android device, just like on a PC, there isn't a utility software that allows you to view your signal strength accurately in dBm. So, again, we recommend downloading an app such as Fing or Wi-Fi Analyzer in order to find the strength of your Wi-Fi signal.
5. Using heat mapping software
Wi-Fi heatmaps are a visual representation of the invisible RF signals that are used to deliver Wi-Fi—including Wi-Fi signal strength.
No business, in our experience, has invested (and for good reason) in this type of software and training. So you'll need to schedule a Wi-Fi performance assessment with an experienced service provider to check your Wi-Fi signal strength using this method.
If you want to know how much a Wi-Fi performance assessment will cost, check out our Wi-Fi Services Quoting Tool.
How to optimize your Wi-Fi signal strength
Client devices require a certain level of Wi-Fi signal strength to be usable. But we don't want it to just be usable, we want optimal performance.
A common mistake when dealing with connectivity issues is to increase the power level on your access points, which can have the opposite effect of what you're trying to achieve. It can actually cause things to get worse by introducing more interference by creating more noise from nearby APs.
Instead of trying to solve the problem by cranking up your power levels—which only boosts the signal of the access point and not the connection between the two devices.
For end users, optimization often looks like DIY troubleshooting. For MSPs and VARs, it’s about embedding these practices into your recurring services.
-
Prevent freeloaders → Offer managed device policies and access controls.
-
Prioritize 5GHz → Build this into your Wi-Fi design standards.
-
Automate firmware updates → Make proactive updates part of your managed bundle.
-
Account for attenuation → Scope environmental challenges during pre-sales assessments.
-
Detect rogue APs → Include monitoring in your managed services package.
-
Reposition or add APs → Bake AP design and placement into your fulfillment workflow.
-
Plan Wi-Fi channels correctly → Reduce interference with structured channel planning.
1. Prevent freeloaders
An unauthorized person or device who is connected to your network is a Wi-Fi freeloader. The amount of devices connected to your network affects your internet speed. Well, these freeloaders take up bandwidth on your network because Wi-Fi is a shared medium, so the more devices, the less everyone gets to use.
So the next step is to check and see if you have any Wi-Fi freeloaders and protect your network from unauthorized use.
Nowadays there's an app for almost everything.
Most likely your internet provider has an app, which you can download and see what devices are on your network. In addition, you can also download Fing from the Google Play Store or Apple Store, which will give you the ability to check for freeloaders, as well as other additional network information that could be useful.
Now—change your Wi-Fi name and Wi-Fi password!
Whether you found Wi-Fi freeloaders or not, it's important to protect your bandwidth from future Wi-Fi leeches by changing to a new and strong Wi-Fi password, as well as changing the name of your Wi-Fi. Here's why...
Many of us may be tempted to use the name and password that was given to us by your ISP, but this can leave your network vulnerable since many ISPs choose from a certain set of passwords, and knowing the ISP name gives hackers a better sense of how to hack your network.
So, change your Wi-Fi name (also known as an SSID) and your Wi-Fi password to something unique. You should be able to do it online or through your ISP's app.
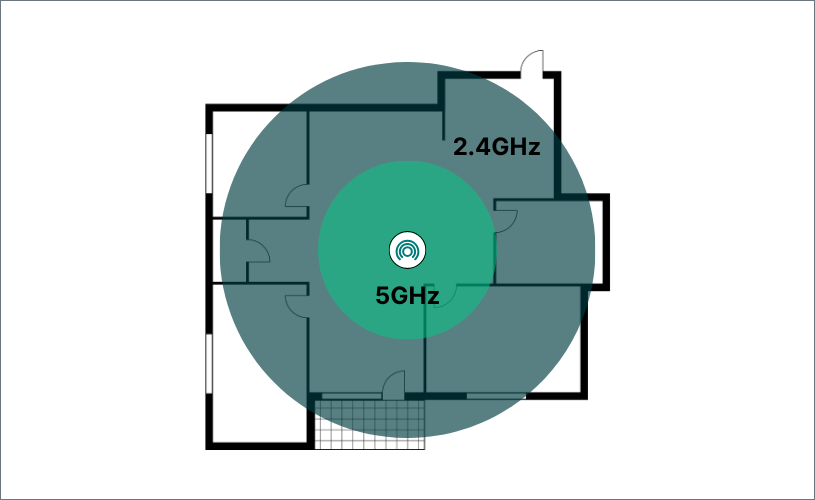
2. Prioritize 5GHz
All enterprise-grade access points support the 5GHz band and most (if not all) business Wi-Fi networks today are being designed for both the 2.4 and 5GHz bands with the 5GHz being the priority.
The 5GHz band not only provides faster data speeds at a higher rate but is also less vulnerable to interference since other nearby devices, such as smart speakers and keyless locks, typically use the 2.4GHz band.
Most importantly, there's more flexibility with 5G because there's more Wi-Fi channels to choose from (which we will in more depth later in this blog, see Check Wi-Fi Channel Plan).
It's important to note that 5GHz doesn't have as far as a reach, so you need to make sure that you have enough APs to support the coverage that you need.
To determine which band your device is currently connected to, go into your Wi-Fi network settings to view the list of nearby networks. Your SSID will appear two (sometimes 3) times and the name that has some version of 5GHz at the end (5, 5g, etc.) is the one you usually want to be on.
3. Automate firmware updates
The next step before you start making more major tweaks to your network or environment is to make sure that your firmware is up to date.
What is a firmware update? The devices we use in our business are powered by two things: the hardware and the software that makes them work, which is known as firmware.
All devices have firmware: smartphones, tablets, access points, network switches, firewalls—even smart TVs all have firmware.
Like any software, firmware can also be improved: bugs can be found and repaired and new features can be added. When a manufacturer releases new firmware and you download the new version, that's called a firmware update.
A firmware update can allow for better signal strength since it's the software that manages and processes all the data coming from your ISP.
So we need to make sure it's a well-oiled piece of machinery from the inside out.
However, there are some bad firmware updates that can render your device non-functional, so always be sure to read the release notes or what the updates include.
A lot of client devices today have automatic updates, and some alert the user when a new update is available.
If the business owns these client devices, for example, scanners in a warehouse, or employee-issued laptops, then keeping things up to date is more than likely already part of your workflow.
However, when you don't own these devices your options are limited and your focus should be on what you can control, in this case keeping your networking equipment up to date.
Most networking equipment is managed through a network management platform to handle firmware updates, again the key is making sure that what you can control is operating on the latest firmware versions.
For more about Firmware updates, check out this 1-minute video: Staying Ahead of Firmware Updates.
4. Account for attenuation
This is where we start getting into the strategic planning and technical side of optimizing your Wi-Fi signal strength.
Your entire environment has a serious impact on how your Wi-Fi signal behaves. Here's where we need to learn about attenuation.
Attenuation is the reduction in power of a signal through open air or as it tries to move through materials; metal, concrete, wood, soil, foliage, etc.(also measured in db). With indoor Wi-Fi, the materials that block Wi-Fi signals are the largest attenuators.
Here's a graph of common materials and the amount of attenuation it creates for your Wi-Fi signal and weakening it's strength:
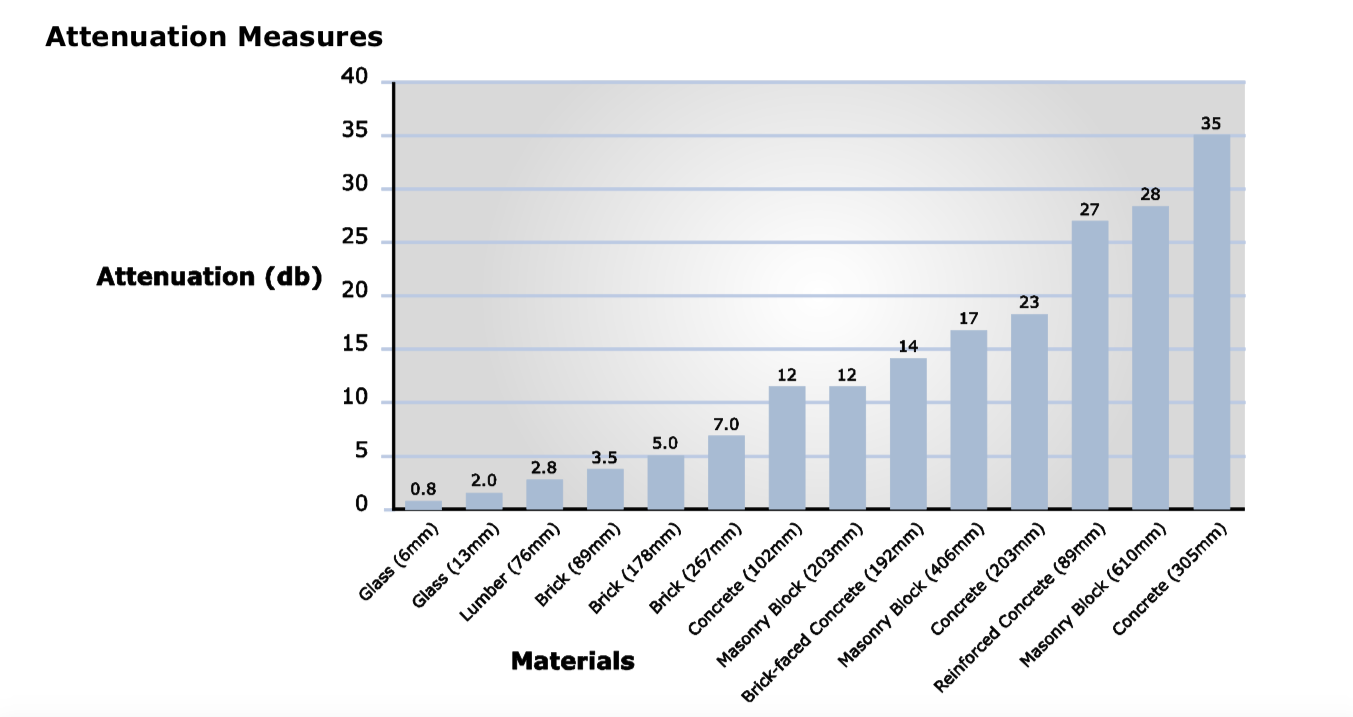
Image Source: Digi
When trying to optimize your wireless network, consider relocating furniture or moving that access point away from that hallway with reinforced concrete.
Pro Tip: Attenuation is not to be confused with interference. Interference is the obstruction of the signal by drowning it out with stronger signals in the same spectrum or disrupting it via other means EMI (Electromagnetic Interference) or RFI (Radio Frequency Interference).
5. Detect rogue APs
A rogue AP is a wireless access point that is not authorized by you; this could be installed by an employee trying to boost their own signal or a malicious attacker who is trying to gain access to your network.
Rogues can impersonate your network and when your devices try to connect to them they will most likely be further away and will have less signal strength.
Removing these rogue APs will improve your signal strength by not interfering with your WLAN design.
6. Reposition or add APs
Repositioning your access point locations or adding new access points is considered a major change and we only recommend attempting this type of work if you have the proper networking and product certifications. If you don't, contact a professional service provider to get help.
With that said, the overall idea is that you want to make sure that you have a clear line of sight between your AP and your devices with minimal obstructions and/or interference. Placing the access point in the center of device activity at ceiling height (~9-12 ft for average business and~15-25ft for warehouses) is in general a great start.
If you have an environment with a lot of physical obstacles, like a concrete wall blocking your signal but you can't remove it, adding access points to the section that's in need of a better signal might be your only solution.
These are just a few tips.
When in doubt, it's always a good idea to have a network engineer analyze your network to find out what's impacting your performance. They can also offer a remediation plan to fix the problems they find.
7. Plan Wi-Fi channels correctly
We talked about 2.4 and 5GHz bands, now let's talk about selecting the proper Wi-Fi channel within those bands. Selecting the proper Wi-Fi channel is important because there may be too many nearby users on the same Wi-Fi channel as you, which is causing interference and a sort of traffic jam.
Now—within both frequency bands, we have several channels (or bandwidth), and here is how it breaks down:
- 2.4GHz = 3 channels (1, 6, and 11) that don't overlap
- 5GHz = 25 channels that don't overlap, but only 9 are universally supported on most devices (36, 40, 44, 48, 149, 153, 157, 161, 165)
Note: Identifying the devices that are being used on the network is also so important to the design process because we need verify all of the supported channels of each device. That way we can then exclude any channels from the design that are not supported by the devices. (It's also just one aspect of what makes designing a great WLAN design so complicated!)
Here's a breakdown of the 5GHz and 2.4 GHz channel:
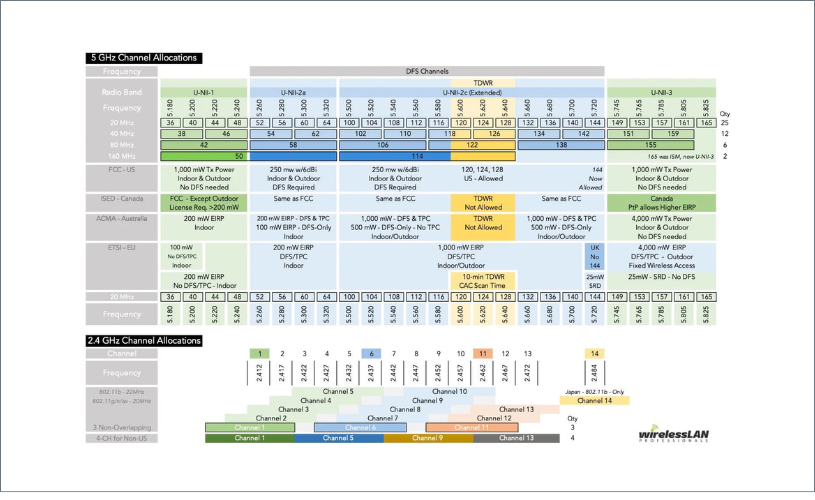
Image source: Wireless LAN Professionals
As a basic guideline, we want to use as many non-overlapping channels as possible, and avoid channel reuse at all costs.
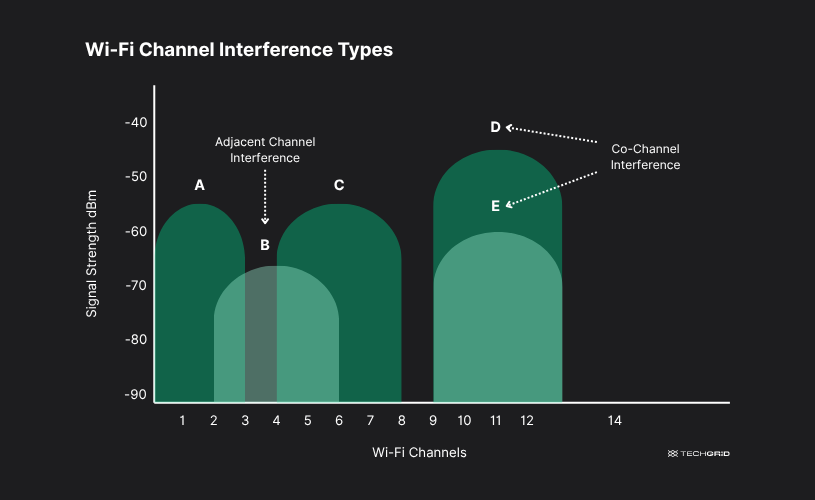
If your access point is operating on a channel other than one of the overlapping channels, that's when co-channel and adjacent channel interference happens.
Co-channel interference happens when there's another device(s) that are operating on the same frequency channel as you—it technically behaves more like congestion.
Adjacent-channel interference occurs when devices from a channel that is overlapping yours are trying to talk over your device. Your AP will just register it as random RF background noise and becomes the worst kind of interference.
You can check for adjacent and co-channel interference with the Wi-Fi Analyzer. As a visual for what to look for and the difference between the two types of interference, please see the image below:
Each of these steps becomes more scalable when supported by digital workflows instead of ad-hoc fixes. That’s the real differentiator between a one-off project and a profitable XaaS offer.
Final thoughts
For MSPs and VARs, Wi-Fi signal strength isn’t the end goal—it’s the baseline. The real opportunity is in productizing Wi-Fi into repeatable, subscription-based services that your team can sell, deliver, and support at scale.
That requires more than RF knowledge. It requires integrated quote-to-cash workflows, procurement automation, and a customer experience layer that builds trust.
With the right platform, you can transform Wi-Fi from a support headache into a predictable, profitable revenue stream.

